STC1160 Review Quick Start Guide: Difference between revisions
John Powers (talk | contribs) |
John Powers (talk | contribs) |
||
| Line 9: | Line 9: | ||
== Installing the software == | == Installing the software == | ||
* From the [https://scriptel.com/support/downloads/ downloads page], download ReviewHub | |||
* Run the installer. | |||
* If you get a message box asking | |||
* Click [Install] | |||
== Configure Monitor Mapping == | == Configure Monitor Mapping == | ||
Revision as of 16:00, 12 November 2025
Attaching the hardware
- Unbox the tablet and components.
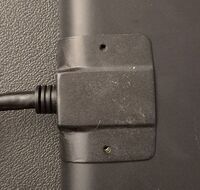
- One end of the cable has an HDMI connector and 2 USB connectors. The other end has only an HDMI connector. Turn the tablet face down and connect that end to the tablet.
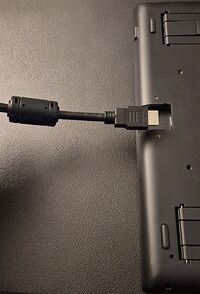
- Using the metal cover, secure the HDMI connector in place with the 2 provided screws.
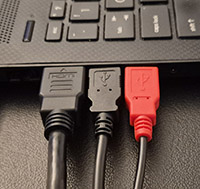
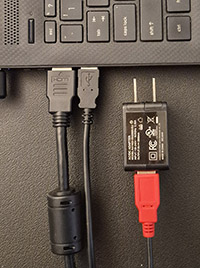
- Connect the other HDMI connector and the black USB connector to the computer. The computer may be able to sufficiently power the tablet through the black USB connector, or it may not. If not, plug the red USB connector into another USB port. If the tablet's display steadily shows your desktop, it's good.
- If this is still not enough to power the tablet, unplug the red USB connector and plug it into the included USB power supply and plug that into a wall outlet.
- You may attach the stylus (pen) with the included lanyard to the tablet. There is an attachment point on the right side, near the rear of the tablet.


Installing the software
- From the downloads page, download ReviewHub
- Run the installer.
- If you get a message box asking
- Click [Install]
Configure Monitor Mapping
With the Review pad plugged in and showing a Windows desktop,
- Open Display Settings, Extend the Desktop, and arrange the displays.
- On the desktop, right-click to open the menu, then left-click on Display Settings.
- Click Identify and note the identity of each monitor, especially the Review Tablet.
- The button to the right of Identify may say Duplicate These Displays. If it does, click it and change it to Extend these Displays.
- Arrange the displays the way you have the monitors arranged in real life. Do this by dragging and dropping the displays until you have them the way you want them.
- Note the number of the tablet. You can always click Identify again.
- Close Display Settings.
- Launch the ViewSonic Pen Manager application.
- Open the ViewSonic Pen Manager.
- Select the Mapping tab.

You will see something like this, showing both (or all) of your monitors. One of them will be the Review pad.

In the picture, the screen on the right is selected. This is the main screen, not the Review Screen, so it is wrong. To correct it, select Monitor number associated with the Review tablet. The default in Pen Manager is 2, but Review will not always be monitor 2. You must find the Review by remembering it from the instructions above or by matching what is on its screen with what is shown on the Mapping tab. Once this is done, you can close the application.
If it is right, the cursor will follow the pen on the Review screen. If the wrong monitor is set, the pen will place and move the cursor on a monitor other than the Review tablet.